Python function chmod to change permission

I naively tried the function chmod from the standard python module called os to change the permission of a file:

os.chmod(filename, 644)

Checking in the unix command line (ls -l), I got an unexpected result:

--w----r-T.

I expected indeed a read-write permission and then 2 read-only. In Python 2.X, you must set the second argument (the mode) to 0644 (note the 0)

os.chmod(filename, 0644)

In Python 3.X, this statement becomes:

os.chmod(filename, 0o644)

and now, we get the expected answer.

-rw-r--r--.

Therefore the mode should be in octal form!! Not obvious from the documentation:

In [5]: os.chmod?
Type:       builtin_function_or_method
String Form:<built-in function chmod>
Docstring:
chmod(path, mode)
 
Change the access permissions of a file.
Posted in Python | Tagged | 2 Comments

green flash / rayon vert

For a change, here is a nice picture taken yesterday showing the green ray that can be sometimes seen when the last ray of the upper rim of the sun hung on the skyline.
rayon_vert_lowres

and here, let us focus on it:

rayon_vert_focus

Posted in photos | Leave a comment

Pandas : how to compare dataframe with None

While comparing a pandas dataframe with None,

import pandas as pd
df = pd.DataFrame() # Note that the dataframe is empty but it does not matter for this example.
if df == None:
    pass # do nothing
else:
   df.describe()

I got this error:

ValueError: The truth value of an array is ambiguous. Use a.empty, a.any() or a.all().

I could go around the problen using the isinstance command:

import pandas as pd
df = pd.DataFrame() # Note that the dataframe is empty but it does not matter for this example.
if isinstance(df, types.NoneType) == True:
#equivalent to if isinstance(df, pd.DataFrame) == False    
    pass # do nothing
else:
   df.describe()

In fact, the first code could be changed just slightly by replacing the comparison operator with the is keyword:

if df is None:
    pass # do nothing
else:
   df.describe()

I could have spared some time by looking carefully into the Pandas documentation

Posted in Python | Tagged | 4 Comments

pygame installation not working due to “linux/videodev.h: No such file or directory” error

I wanted to install the python package called pygame. I encountered quite a few issues before being able to install it. I’m reporting here some of the solutions.

Before starting, keep in mind that you can install pygame using apt-get under ubuntu or yum under Fedora, but again here this is within a virtual environment.

First, I tried :

pip install pygame

The package was not installed. An error compilation was raised:

  linux/videodev.h: No such file or directory

This is due to missing libraries for development. When you come back to the installation configuration, you may see some text like:

WARNING, No "Setup" File Exists, Running "config.py"
 Using UNIX configuration...
 
 Hunting dependencies...
 SDL     : found 1.2.14
 FONT    : not found
 IMAGE   : not found
 MIXER   : not found
 SMPEG   : found 0.4.5
 PNG     : found
 JPEG    : found
 SCRAP   : found

For instance, you need to install this library under Fedora:

sudo yum install libv4l-dev

Let us now try to install pygame again:

pip uninstall pygame
pip install pygame

Still get the same error…Although the library is installed, it cannot be found because it is expected to be found in another folder. Let us therefore create a dynamic link

cd /usr/include/linux
sudo ln -s ../libv4l1-videodev.h videodev.h

Try the installation again. It should work now. Note hoewever, that you may have other missing libraries. For instance I had the font module missing.

import pygame
import pygame.font
 
Traceback (most recent call last):
File "/usr/local/lib/python2.7/site-packages/pygame/__init__.py",
line 70, in __getattr__
raise NotImplementedError(MissingPygameModule)
NotImplementedError: font module not available
ImportError: No module named font)

In order to solve the font error, install the SDL_ttf package:

sudo yum install SDL_ttf SDL_ttf-devel

You may need more of those libraries from SDL (e.g., SDL_image and SDL_image-devel)

I finally could use the pygame library. I had still some issues with imageext module (can use only bmp extension so far but this is another SDL library missing I suspect…)

Posted in Python | Tagged | Leave a comment

perl: define a module to be called in another script

First, define a module. The module must be in a path reachable by perl (e.g., local directory). Then, to make a script a valid package, you need to proceed as follows:

  • Rename the perl script with the extension .pm
  • It must return True. Just add 1; on the last line
  • Give a name to the package by adding package CLEVERNAME;on the top

The name of the file is the name given to the package internally (CLEVERNAME). The package is now ready. For instance:

#!/usr/bin/perl -w
package CLEVERNAME;
sub my_function {
    print STDERR "It works\n";
}
1;

On the script side, create a perl script and use the use command as follows (assuming there is a function called my_function in your package:

#!/usr/bin/perl -w
 
use CLEVERNAME;
 
# call you function 
CLEVERNAME::my_function;
Posted in Uncategorized | Tagged | Leave a comment

sed: how to add text at the end of the file

Use the $a syntax and sed:

sed -i '$a some text' filename

-i parameter means in place. To test without changing the original file, remove the -i option. The results will be print on the screen.

A previous post explained how to insert a line anywhere but for completeness. Indeed, with the $a syntax you append content and therefore you can append text after a line. Therefore you cannot append text before the first line. Instead use the i command:

sed -i  '1i some text on first line' filename
Posted in Linux | Tagged | 2 Comments

Open VID file in VirtualBox

I’ve been using VirtualBox for a few years mostly to test software on different distributions. This is really a great tool really easy to use. I usually get an ISO file from a distribution (e.g. Fedora) and install it within the virtualbox. The virtual environment is saved locally within a Virtual Disk Interface (VDI).

Today, I got a VDI file that is suppose to be used within a virtualbox but I did not know what to do with it. I naively copied it in the VirtualBox directory (.VirtualBox) or tried to open it in the menu (File->Open) but could not recognised.

Finally, I followed those simple steps. First, you need to create a new virtual environment inside VirtualBox.

  • So, first go to Menu->Machine->new
    a new window will open.
  • Type a name, select a type and version and click next
  • In the new window, set the memory size and click next
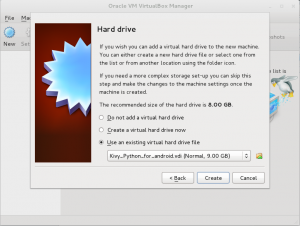
  • Now you have 3 options and that is where you will use your VDI (third option “Use an existin virtual hard drive filevmbox
  • and finally click “Create”.
    You will come back to the main window. You VDI has been set up.
Posted in Linux | Tagged | Leave a comment

matplotlib: difference between pcolor, pcolormesh and imshow

If you have a matrix and want to plot its content as an image, matplotlib provides some functions such as imshow and pcolor.
c

Differences between imshow and pcolor

Let us use a simple 3 by 3 matrix and call imshow and pcolor.

from pylab import *
data = random((3,3))
figure(1)
imshow(data, interpolation='none')
figure(2)
pcolor(flipud(data))

Note the values of the data :

array([[ 0.72080244,  0.25576786,  0.67696279],
       [ 0.47049696,  0.54773236,  0.9342035 ],
       [ 0.83608481,  0.96395743,  0.24782517]])

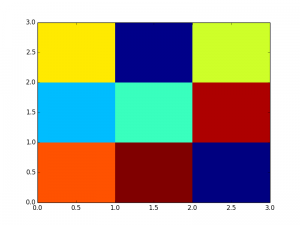
Here are the figures; color code is: dark red=1, yellow=0.5, dark blue=0
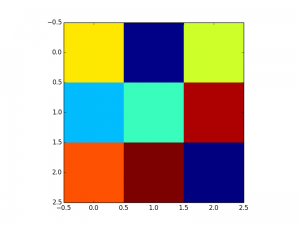
imshow

pcolor

So, the main differences are:

  • imshow follows a convention used in image processing: the origin is in the top left corner. So the value 0.72 ( first row and first column in the matrix) appears in the top left corner. pcolor has a different convention; that is why we used the function flipud in the code above so that the two figures look similar.
  • pixel locations are different as you can see on the x/y axis: placed at position 0,1,2 in imshow and between integer location in pcolor
  • parameters used in the 2 functions are different and we let the reader look at the documentation for more details
  • (update oct 2018). imshow function is also 4-5 times faster than pcolor (thanks to a comment from norok2) from matrices with dimension above 20-30. One can use the script here below to confirm this statement.

Differences between pcolor and pcolormesh

The 2 functions are almost identical. There are two main differences. The returned object differs: pcolor returns a class
`~matplotlib.collections.PolyCollection` but pcolormesh returns a class `~matplotlib.collections.QuadMesh`.

However, the main important difference is that pcolormesh is much faster by several order, as you can see in the figure below, which can be re-generated with the following code:

from pylab import *
Tmesh = []
T = []
Xvector = range(10,500,20)
# We one dimension of the matrix only, the other being fixed to 100
for N in Xvector:
 
    data = random((N, 100))
    t1 = time.time()
    pcolor(data)
    t2=time.time()
    T.append(t2-t1)
    t1 = time.time()
    pcolormesh(data)
    t2=time.time()
    Tmesh.append(t2-t1)
plot(Xvector, T, 'b', label="pcolor")
plot(Xvector, Tmesh, 'r-', label="pcolormesh" )
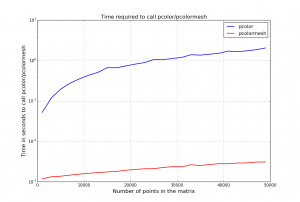
pcolor_performance

As suggested by a few comments, the next question is why shall we use pcolor instead of pcolormesh ? From pcolormesh documentation, an additional difference is:

in pcolormesh *C* may be a masked array, but *X* and *Y* may not.
Masked array support is implemented via *cmap* and *norm*; in
contrast, :func:`~matplotlib.pyplot.pcolor` simply does not
draw quadrilaterals with masked colors or vertices.

Yet, I have not encoutered a case where pcolor should be used instead of pcolormesh.

Posted in Python | Tagged | 13 Comments

Python editor

The general purpose tool I used for edition is vim… I know, this is not very friendly but to edit a couple of files, it’s fast to start, fast to edit, has completion and much more.

Yet, sometimes, a dedicated editor can add lots of value. I’ve tried many but Spyder is the best I’ve seen and I use it as soon as I have to edit several files at the same time, which means most of the time nowadays.

If you are used to vim, the spyder editor looks a bit poor but I’m sure this is going to be better and better. However, there are tools you will not have in vim:inline documentation that interprets docstring, pylint, ipython shell included and so on.

There was one missing functionality though that is the code completion. I thought it was missing but finally figured out that this can be achieved via Ctrl+Space. To have the completion, you may need to install the rope package. In a shell, just type:

pip install rope

references: http://stackoverflow.com/questions/18044312/spyder-does-not-autocomplete-local-variables/18049713#18049713

Posted in Python | Tagged | Leave a comment

Accessing UniProt with Python

BioServices provide an easy way to access UniProt

In a previous post, I provided a simple example, reproduced here below, but in this post I also provide the link to a ipython notebook I’ve just created, which contains much more contents.

IPython notebook UniProt

>>> from bioservices import UniProt
>>> u = UniProt()
>>> d = u.quick_search("MEK1+and+taxonomy:human", limit=5)
>>> for entry in d.keys():
...    print("Entry name: %s, d[entry][Entry name"])
MP2K2_HUMAN
MP2K1_HUMAN
WNK2_HUMAN
BIRC6_HUMAN
MK03_HUMAN
Posted in Python | Tagged , | Leave a comment