sphinx raise a WARNING: Duplicate explicit target name:

Sphinx is a great tool for developers who want to write nice documentation about their software. I actually use it also to take notes or write about other stuff.

From time to time I have a warning such as :

index.rst:2 WARING: Duplicate explicit target name: "github"

This is a bit annoying since, the information is a bit parse. Here, I am told that on line 2 there is a duplicated name… Yet, on line 2 there is no mention of github or target name. The tool is great, again, but sometimes a bit cryptic and to be honest since it relies on restructured text syntax (docutils), the warning is sometimes related to the underlying syntax, not sphinx itself.

Looks like this is the case here.

Consider this code::

TEST
====
:Source: See  `source <https://github.com/sequana/sequana/>`_.
:Issues: Please fill a report on `github <https://github.com/sequana/sequana/issues>`_
 
To join the project, please let us know on `github <https://github.com/sequana/sequana/issues/306>`_.

Note the syntax first:

`github <https://github.com/sequana/sequana/issues>`_

This code (back quotes) indicates a link. The first word (github) is what will appear in the HTML content.
Then, the link follows (surrounded by less than and greater than characters). The final _ underscore character is part of the syntax.

If you compile this code with sphinx (e.g. version 3.0.1), you will get a warning

`github <https://github.com/sequana/sequana/issues>`_

but not for the first link. So, indeed the duplicated link to the same word raise the warning.

How to avoid this warning ? Very simple: duplicate the underscore at the end of the link:

:Source: See  `source <https://github.com/sequana/sequana/>`_.
:Issues: Please fill a report on `github <https://github.com/sequana/sequana/issues>`__
 
To join the project, please let us know on `github <https://github.com/sequana/sequana/issues/306>`__.
Posted in Uncategorized | Tagged | Leave a comment

bioconda (how to build recipe locally)

Bioconda is great. From their web site, “it is a channel for the conda package manager specializing in bioinformatics software”.
It provides over 7000 bioinformatics packages ready to use with conda install and over 850 contributors and 570 members who add, modify, update and maintain the recipes (Marc 2020).
4 years ago, I actively added tens of packages, including my software. What happened in those early days is that the dependencies of your software what not neccesseraly available on bioconda. Those days, with 7000 packages, most of the time everything is there. Yet, not always. This week, I needed a small dependency not on bioconda. So, I started to build the library and realised I forgot how to do that. Besides, lots of changes happened on the bioconda project. Anyway, I looked at the documentation and had to fight a little bit. At the end, this is very simple as shown here below.

Check out the bioconda website for contributors for up-to-date information.

First, create a fork in your github account following this link https://github.com/bioconda/bioconda-recipes/fork.


git clone https://github.com/your_username/bioconda-recipes.git
cd bioconda-recipes
git remote add upstream https://github.com/bioconda/bioconda-recipes.git

Time to create your own recipes and push it on the bioconda build system. To create a new recipes, look at what others have been doing. For software available on pypi, it is generally eased using e.g.

conda skeleton pypi newsoft

other recipes are explained here.

Time to check the recipes. How to test your recipes locally before hand ?


conda create --name bioconda bioconda-utils
source activate bioconda
bioconda-utils build recipes config.yml --packages newsoft

Finally, inform bioconda of the new recipes with a new commit/push


git checkout -b newsoft_recipe
git add recipes/newsoft/meta.yaml
git commit . -m "add new recipe for newsoft"
git push --set-upstream origin newsoft_recipe

Then, create the pull request and follow the instructions.

Posted in Software development | Tagged | Leave a comment

How to Mount and Use an exFAT Drive on Fedora Linux

Yesterday, I got this hard drive from a collaborator with huge amount of sequencing data on it. Under fedora 23, I pluged in the hardrive, open the browser, click on the hard drive name and and got this error message:

Error mounting /dev/sdb1 at /media/BLABLIBLABLA: Command-line `mount
-t “exfat” -o “uhelper=udisks2,nodev,nosuid,uid=1001,gid=1001,iocharset=utf8,namecase=0,errors=remount-ro,umask=0077”
“/dev/sdb1” “/media/BLABLIBLABLA DATA”‘ exited with non-zero exit status 32: mount: unknown filesystem type ‘exfat’

damm. Okay, after a quick browsing it appears that you just need to install this package:


sudo dnf -y install exfat

but it was already installed. After some more browsing, you also need that one:

sudo dnf -y install fuse-exfat

And that’s it.

Posted in Linux | Tagged | 10 Comments

Updated wordpress version crashed the wp-admin access

From the wordpress admin interface, I updated the plugins and the wordpress to 5.2.2 but ot this unplesant error:

Parse error: syntax error, unexpected '[' in /home/xxxx/www/blog/wp-content/plugins/googleanalytics/class/Ga_Admin.php on line 375

Consequently, I could not access to the admin site of my wordpress blog.

I decided to contact my provider (OVH) and got responsive answer. After many years using the wordpress that was the first time I had this kind of issue so getting a quick answer was a relief.

The apparent culprit was the google analytics plugin. The solution was to rename the plugin into a dumm one while fixing the main issue (see later).

Using an ftp access to the blob, once connected:

cd  wwww
cd blog
cd wp-content
cd plugins
rename googleanalytics googleanalytics.0

Then, I update the wordpress to 5.2.2 and was first planned and then I entered in many more issues. Indeed, I had to update the php version to 7.3 and then, many plugins were not compatible anymore.

In particular, the plugin crayon syntax highligher, is not compatible anymore. So I had to remove it.

Then, I moved back the google analytics plugin into its original name and everything was working again (more or less).

reference (infrench): https://community.ovh.com/t/plus-dacces-admin-au-compte-wordpress-apres-update/20210

Posted in wordpress | Leave a comment

git error solved: The remote end hung up unexpectedly

Sometimes, when you clone a git repository you may end up with a fatal error “The remote end hung up unexpectedly”.

For instance, typing this git command to clone a repository of mine:

git clone https://github.com/sequana/sequana

led to this message ending with the fatal error :

Cloning into 'sequana-0.8.0'...
remote: Enumerating objects: 58, done.
remote: Counting objects: 100% (58/58), done.
remote: Compressing objects: 100% (40/40), done.
error: RPC failed; result=18, HTTP code = 200KiB | 5.00 KiB/s   
fatal: The remote end hung up unexpectedly
fatal: early EOF

One solution is to increase the buffer used by git from the unix command by exporting this environment variable:

export GIT_HTTP_MAX_REQUEST_BUFFER=100M

and then it worked out of the box:

Cloning into 'sequana-0.8.0'...
remote: Enumerating objects: 58, done.
remote: Counting objects: 100% (58/58), done.
remote: Compressing objects: 100% (40/40), done.
remote: Total 26318 (delta 31), reused 38 (delta 18), pack-reused 26260
Receiving objects: 100% (26318/26318), 17.93 MiB | 8.00 KiB/s, done.
Resolving deltas: 100% (18760/18760), done.
Checking connectivity... done.

You may do that once for all using the git config command:

git config --global http.postBuffer 100000000
Posted in Linux | Tagged | 7 Comments

How to find differences between two directories using diff command

When you copy a directory with many files, you may want to check whether the copied directory is indeed an exact copy of the original. You can do that by comparing all files. You can write your own script checking every single file. You can also use standard tools under linux such as the diff command:

diff -r folder folder2 | grep -v "^diff -r " | sort

Here, the diff command check for all files recursively (-r). It returns a so-called diff file format including the differences. If we are interested by which files are different only, then we can use the grep command to simply return the file names that differ.

Posted in Linux | Tagged | Leave a comment

pypi upload failed due to non-existent authentication information

After trying to upload a package on Pypi website using

python setup.py sdist upload

I got this error message:

Submitting dist/XXX-0.7.5.tar.gz to https://upload.pypi.org/legacy/
Upload failed (403): Invalid or non-existent authentication information.
 error: Upload failed (403): Invalid or non-existent authentication information.

Despite having registered and succesfully uploaded package before. What happened is that I updated my account on Pypi website by changing the password. So, in such case, just update your .pypirc file, which can be found in your home directory.

[distutils]
index-servers =
    pypi
 
[pypi]
username: blabla
password: blabla
Posted in Uncategorized | Tagged | Leave a comment

format USB key under fedora

I created a bootable USB key and needed to format the key so that others could use it again.

Using the format option (see image below) in the KDE file environment, I got this error:

    This partition cannot be modified because it contains a partition table; &gt;please reinitialize layout of the whole device. (udisks-error-quark, 11)

I then tried to use the gparted tool. You can install it easily using

dnf install gparted

and starting the tool as sudo (sudo gparted).

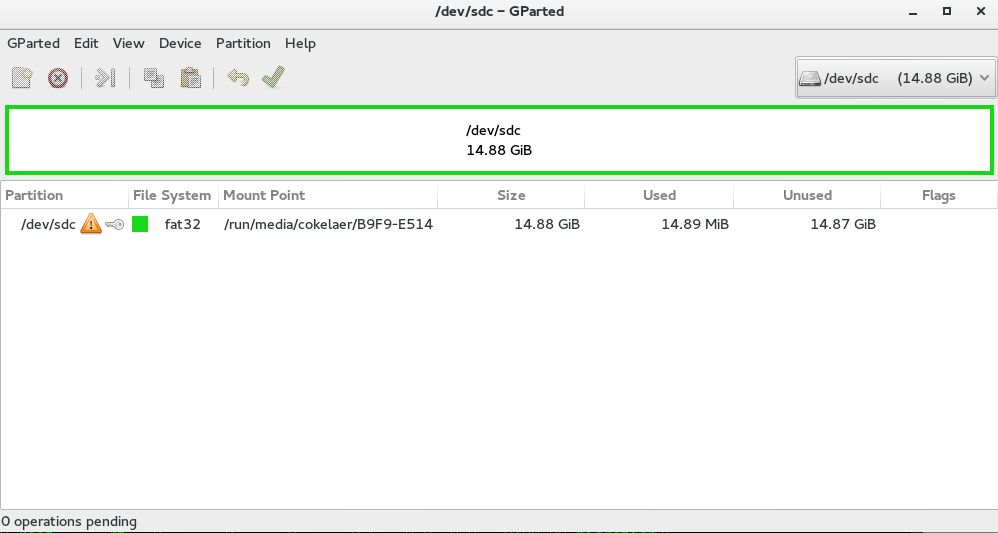
You can select the partition you want to change in the top right corner (see image here below for a snapshot of the interface).

You can check the name of the partition using the linux command

df -h

Once the USB stick is selected, click on the “Device” tab > Create Partition Table.
However, there was several errors telling me that the partition could not be changed.

So, I then tried the mkfs linux command line tool:

 sudo umount /dev/sdc1
 sudo mkfs.ext4 /dev/sdc1

This seemed to work but wait a minute: the disk is 1.7Gb as if it was not really cleanup from the fedora bootable partition. I know that the USB disk is actually 16Gb large. So 13G is unallocated.

Somehow, going back to the KDE environement (image at the top), I click the format option, umount / mount and now I can see the 16G. This can be check visually using gparted (image below).

Posted in Linux | Tagged , | Leave a comment

All about RNA and DNA sequencing

Great entry with description of RNA and DNA sequencing: enseqlopedia. If you want to know about RNA-seq method but also smart-seq, MARS-seq and all the -seq methods, this is a good starting point.

Posted in bioinformatics | Tagged , , | Leave a comment

missing SAM header with minimap2 and samtools

When using minimap2 to map sequencing reads onto a reference, you can use this kind of command (be careful, this is wrong as you will see later):

minimap2 -a -x map-pb test.fastq reference.fasta > minimap.sam

The command is verbose and prints this kind of information. Note here the WARN%ING:

[M::mm_idx_gen::0.338*0.98] collected minimizers
[M::mm_idx_gen::0.464*1.19] sorted minimizers
[WARNING] For a multi-part index, no @SQ lines will be outputted.
[M::main::0.464*1.19] loaded/built the index for 863 target sequence(s)
......

Then, if you try to convert or read this file, you will most problaby get an error. For instance, to convert this SAM file into a BAM format (using samtools), you will get this error message:

[E::sam_parse1] missing SAM header
[W::sam_read1] Parse error at line 2
[main_samview] truncated file.

The solution took me a while but is very simple: if you check the help message of minimap2, you will see that the reference should be provided first. So the top command should be:

minimap2 -a -x map-pb reference.fasta test.fastq > minimap.sam

that is the reference comes first and then the data.

Posted in bioinformatics | Tagged , | Leave a comment